Case in point: while cleaning out the basement I found a large tote of half-finished sewing projects. There was a cute dress with uneven seams. Several packets of patterns. Heaps of fabric.
What can I say- I used to be really into "Project Runway."
I'm feeling pretty proud of myself this morning though because I have two -two- finished projects sitting in my dining room. Unprecedented!
Project #1: New artwork
Step 1- buy a blank canvas (or three) at the craft store. Buy some paints too if you don't already have some. I bought a package of acrylics. Pick up a brush while you're at it. And some spray paint.

Step 2- using a color scheme of your choice, paint all over the canvas. I chose blotchy circles. In retrospect I wish I would've done vertical rectangles, but whatever. First time's not usually the charm. Allow paint to fully dry.
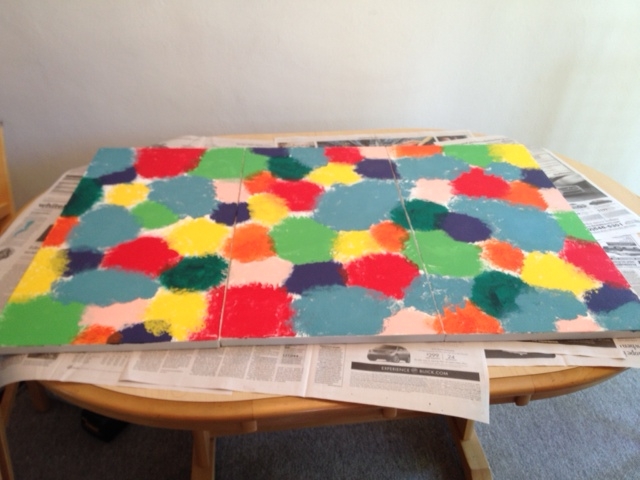
Step 3- now comes the hard part, though it's still not too bad. Using painter's tape, cut out rectangles of even size. I laid mine out in a herringbone pattern, though you could do whatever pattern you'd like. I debated doing a trellis, but I like how this looks.

Step 4- go to town with your spray paint. When dry, peel the tape. Finish off the edges of the canvas with some paint as well in order to cover any spillover.
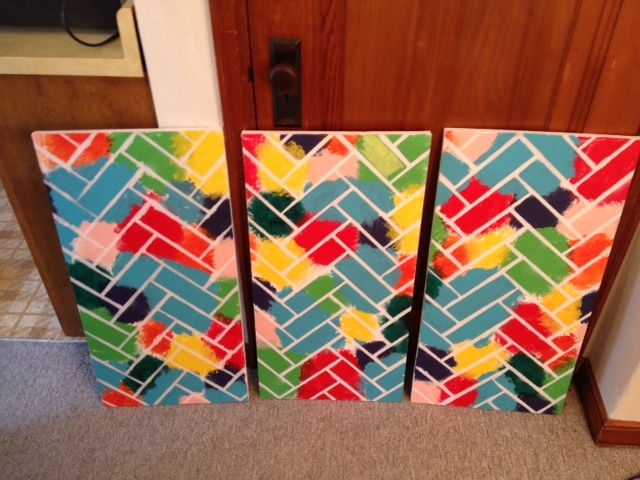
Ta da! The nice thing about this project is if you don't like how it ends up, just paint over it.
Project #2: New chair covers
Big news that I should've mentioned earlier- my husband and I bought our first home. We're really looking forward to moving in a few weeks. Our new place has a four season porch, where we plan to eat most of our meals. Since new patio furniture isn't in our budget, we're going to use our current dining set (hand me down from my parents). But, it's not very porch-y, so I bought some outdoor canvas in a summery print and put it right over the existing fabric.
Step 1- Flip the chairs upside down and using a screwdriver or electric drill, unscrew the bolts connecting the chair base to the pad.
Step 2- Lay out your fabric and place the chair pads on top. Cut the fabric allowing for about a 1-2" overlap- so you have room to staple the fabric down on the underside.
Step 3- Using the heavy duty stapler that your friend Kayla loaned out* (*please do this- do not attempt to use liquid stitch like I initially did), pull fabric tightly and staple in place.
Step 4- Refasten chair pads to chair base. My husband was happy to be able to use his electric drill.


Ta da! Much better for our new porch.
I even saved the leftover fabric to make matching pillows. I just have to make sure the fabric doesn't end up in the tote of doom.
No comments:
Post a Comment